Mac users – good news! You can use Sterling Trader® Pro on a Mac with additional software (Please note you will need the admin password for your Mac for this process).
There are multiple ways to access Sterling Trader® Pro from your Mac. Below are the top 3 ways to use Sterling Trader® Pro on a Mac including a description of each of them.
1. Boot Camp
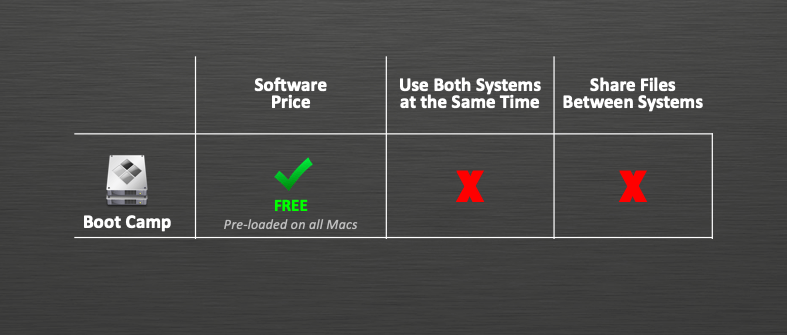
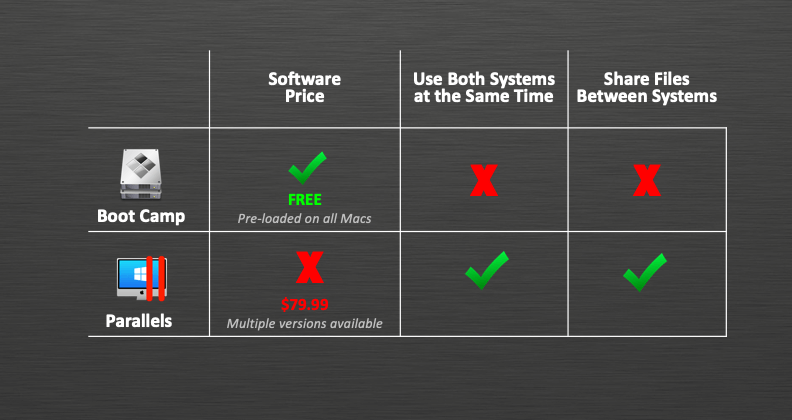
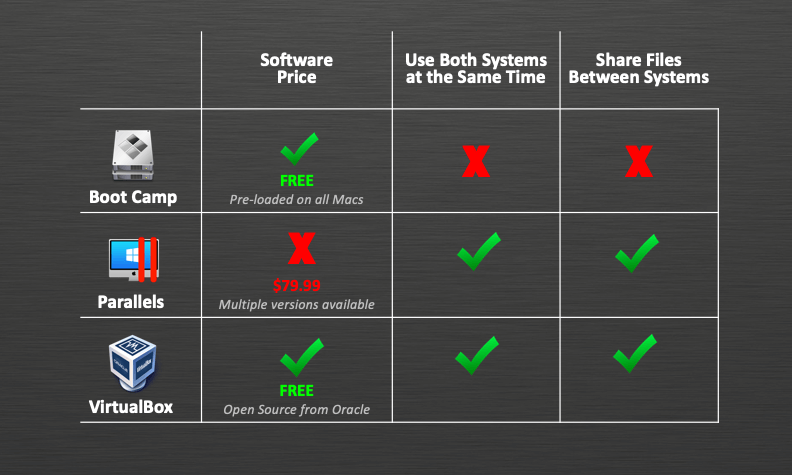
Boot Camp is a utility that comes with every Mac and lets you switch between macOS and Windows operating systems. Since Boot Camp is available on your computer, there’s no cost to use it. However, you cannot use both operating systems at the same time or share files between systems, in order to switch systems, you have to re-boot/re-start your computer every time that you need to switch. While this is a reliable option, it’s not the most time effective.

2. Parallels
Parallels is a paid application that provides software for hardware virtualization for Mac computers to run Windows. There are a variety of versions available for purchase, the standard software is $79.99 – however you are able to use both systems at the same time – like picture-in-picture and you can share files between systems. While this too is a reliable option, there is a cost involved.

3. VirtualBox
VirtualBox is an open-source tool from Oracle that allows you to create a virtual machine for Windows running on Mac OS X.

Here are the steps to download and use VirtualBox for Sterling Trader® Pro
- First you will need to download Windows onto your Mac. Use this link https://www.microsoft.com/en-us/software-download/windows10ISO or from Google, type in “Download Windows 10” and click on the Download Windows 10 Disc Image (ISO File). Select the edition – Windows 10 and the language. Next click on 64-bit Download and save the file.
- Then you need to go to virtualbox.org. Click on the large green download button and then under PLATFORM PACKAGES select OS X Hosts. Then click on the .dmg file to keep selecting CONTINUE to install. You can make a short cut with the icon as well.
- Next, once you have VirtualBox open, in the main box or screen, the top left blue button says NEW, click on the NEW button and then ‘name’ the operating system. Select the type, which is Microsoft Windows – and select the version – which is Windows 10 (64-bit).
- After that, you will then have to select how many gigs of RAM you would like to dedicate to this ‘new’ operating system. Don’t go over the red limit. 10 Gigs minimum should be sufficient.
- Then select, ‘Create a Virtual Hard Disk’ now and hit Continue. For the file type, select the first option, VDI (VirtualBox Disk Image) and hit Continue. For the storage on the physical hard disk, select Dynamically allocated – meaning it is only taking up what you are using, so if you have allocated 30 gigs and are only using 10, only 10 will be allocated of the total 30. Then select CREATE and you will see your virtual machine on the left.
- Now you need to install Windows onto your new system. Make sure the virtual machine is selected in the main menu and go to the settings icon at the top left. Then go to the ‘Storage’ tab and you will see your virtual machine and then the CD/DVD Rom of the virtual machine. This is where we will install Windows 10. Select the Disc Icon that says empty and then to the right, the drop down that says Optical Drive click the drop down and then select the Windows 10 file. In this same settings box is where you could share files between machines. Click ok and then click on the green Start arrow and now it’s booting the Windows installation. You will then be prompted to activate Windows 10 with a product key, which if you have you can go ahead and enter, but you can continue for now without a key. Select Home, click next, accept and then select the option of: Custom Install Windows only (advanced). Then you will see your drive and the space you allocated. Select NEXT to complete the installation. You can customize your Windows settings or use the express settings for Windows. You will then have to create an account and can opt to make a password or not. You will then be asked if you want to use Cortana, and then your Windows operating system will open as a window on your Mac.
- Last, go back into your VirtualBox Manager, click on settings for your new machine that you named, go back to storage and remove the DVD from the CD Rom Drive so that VirtualBox doesn’t try to install Windows 10 every time you use it. Now from your Mac you can download Sterling Trader® Pro on Windows through your virtual Windows operating system.
With any of these options above you are able to use Sterling Trader® Pro on your Mac computer.


